Android / iOS
Update the app on the App Store/Google Play store to the most recent version.
Then:
Open the Zoom app
Choose Settings (Gear icon)
iOS: choose Audio then scroll down to reveal “Use Original Sound”
Android: find setting labeled “Use Original Sound”
Toggle “Use Original Sound” to On
Then
Initiate a Zoom meeting
Choose the “. . . More” icon
Choose “Enable Original Sound”
Note: You must enable original sound each time you want to use it on a new call
Computer
Note: you must change BOTH your online account and your client settings for this feature to work properly. Both sets of instructions are below. You must also turn on the option (or ensure it is on) when you join a meeting.
To enable Preserve Original Sound on your online account
1. Sign in to your Zoom account on their website
2. Go to Settings.
3. Go to the Meeting tab.
4. Under “In Meeting (Advanced)”, make sure that “Allow users to select original sound in their client settings” is enabled.

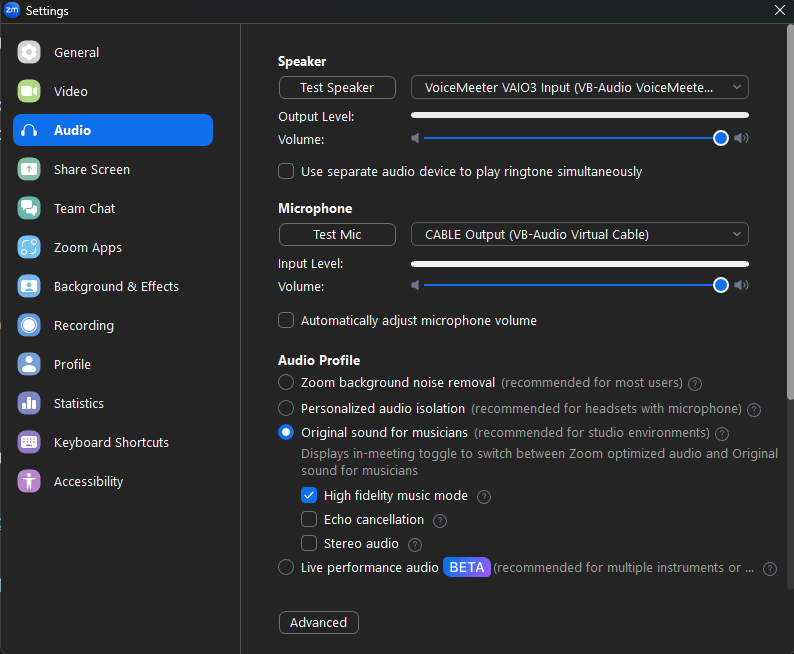
Turning on the option in the Zoom Client
0. Make sure your Zoom client is up to date.
1. In the Zoom client, click on Settings.
2. Choose the Audio tab.
3. Scroll down and change these settings
- Automatically adjust microphone volume should be off
- Audio Profile should be set to Original Sound for Musicians
- High fidelity music mode should be on
- Echo Cancellation should be off
- Stereo audio should be off
4) Click into the advanced menu and turn:
- Echo Cancellation to auto
- Signal processing by Windows to Off – if on a Windows Computer

Note: If you have enabled the setting online but cannot find the setting in your Zoom application. Log out and back in on the app and the option should appear.
Preserving Original Sound in a Meeting
Once in a meeting, the option to turn on Original Sound will now appear in the top left corner of your Zoom window
